Using List of Values
|
In IFS Cloud Web pages, Lists of Values (LOVs) are drop down menus which offer a list of options where you can select a value for the input field. This list can either be set in advance by the system administrator, generated from data in a database column, or you may even have the option to type in new values. |
 |
There are two types of LOVs in IFS Cloud: Free Input LOV: Allows you to type any value to the field or select a value from the drop down menu. LOV: You can only select a value from the drop down menu. If you try to select a value that does not included in the provided list, you will get the following error message :
|
|
Note: When you enter a value in a LOV field and tab to another section, the system will search for the exact value you typed. If an exact match is not found, the system will search for similar values and list them in the LOV drop-down. If no exact or similar values are found, the system will display an error message. |
Features
|
The LOV incorporates essential features to expedite your search, ensuring a more efficient and faster retrieval of the results you seek. |
 |
Click on each tile below to learn more about the various aspects of LOV:
|
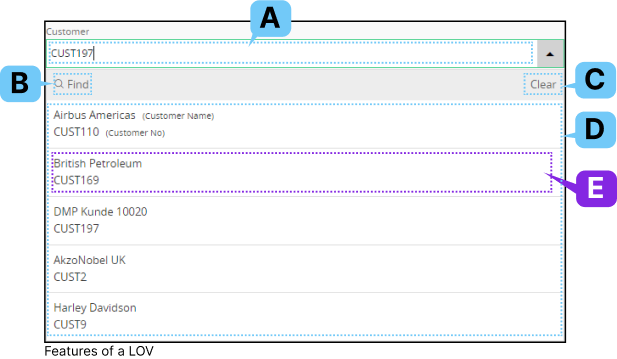
Value Field |
A. |
 |
Type a valid value or any value (depending on the type of LOV) into this field. As you input a value, the data displayed in the Value List (D) will automatically filter to show you the most relevant result. If the value you enter in the Value Field doesn't match any of the options in the List of Values, you will receive a prompt saying "No valid matches." |
|
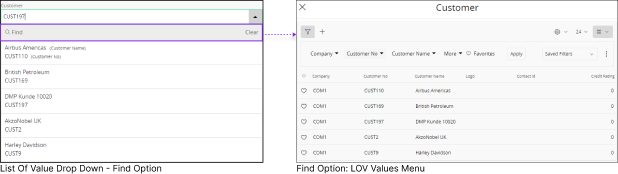
Find |
B. |
|
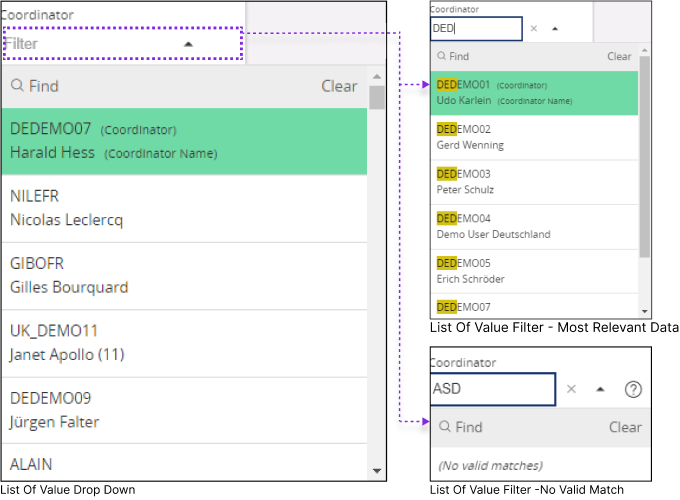
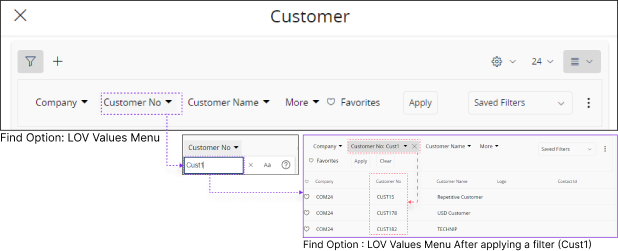
Click on the Find button to access LOV filter section. This section shows all the values within the list, and you can filter the desired value or perform any action shown in Filter Search Pane section. |
 |
This option is handy when dealing with a large number of records in the LOV, and you want to focus on viewing a specific set of records initially. In order to filter set of values follow the steps below: |
||
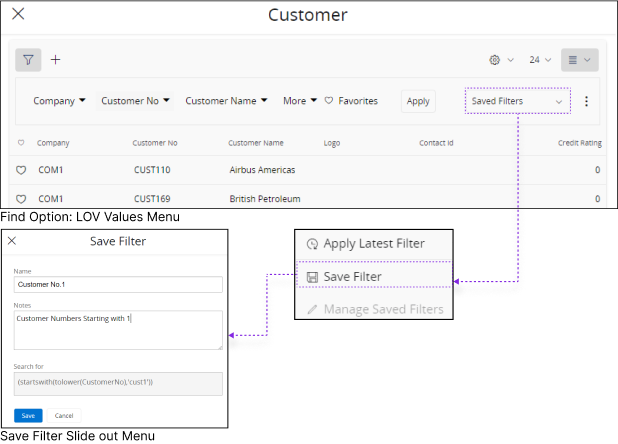
Filter LOV Values |
|||
 |
Example: Imagine you wish to view only the records in the LOV which has a customer number starts with 1
|
||
Save LOV Filter |
|||
 |
|
||
Apply Saved Filter to LOV |
|||
 |
|
||
|
Note : When there is a large amount of data to be loaded in the LOV, clicking the LOV drop-down menu may not display any value until the data is fully loaded. This process can take several minutes. In such cases, you can click the Find button to instantly access the LOV filtration menu and apply relevant filters to pinpoint the exact value needed. |
|||
|
Clear |
C. |
|
Clear out the values you entered on value field. |
|
Value List |
D. |
The Value List will only show a limited number of input values initially, certain Value Lists have a scroll bar on the left, allowing you to scroll down and choose
the specific input you require. Note: System administrator decides:
|
|
Value List |
E. |
Value list - Tile consists of distinctive properties to help you to easily identify / filter it.
System Administrators decides:
Example : The Value List Tile below displays two data fields: Customer Name and Customer Number. You can use either of these fields to filter and select the desired value from the drop down menu. 
|
Timezone Supported Date/Time fields Within LOV Tiles |
||
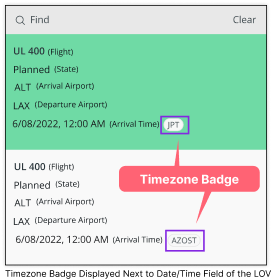 |
When a date/time fields within the LOV tile is timezone supported, a timezone badge will be displayed next to the date/time field. This badge indicates the timezone from which the date/time value is being recorded. |
|
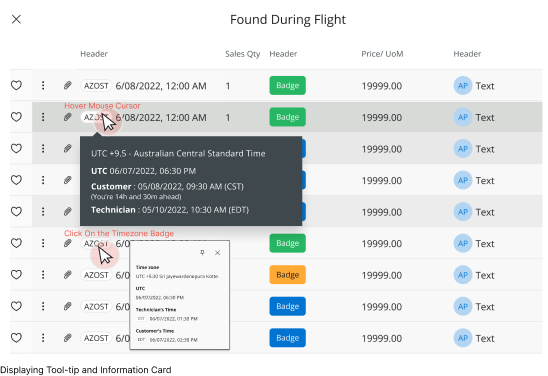 |
If you access the advanced LOV, a timezone badge will appear next to each date/time field, similar to the display in tables. Hovering over the timezone badge will show a tool-tip with additional timezone-related information. Clicking the timezone badge will open an information card containing further details. The content shown in both the tool-tip and the information card is determined by the administrator. |
|